Stepper (Form)
Stepper wizards are powerful components that define a sequence of logical & numbered steps. https://teradata.github.io/covalent/#/components/steps
Where do i get the code?
https://github.td.teradata.com/ux/covalent-training/commits/feature/stepper-form
Setup
Stash away any items not needed for this lab
git stash
Checkout the repo
git checkout 2ec78d65108b380bc929f07b839f1b814e3aefcf
start the local angular-cli server:
git serve
you should see
** NG Live Development Server is running on http://localhost:4200. **
Lets get started!
First we are gonna dive into the form code and wrap it with with a stepper wizard.
<td-steps flex>
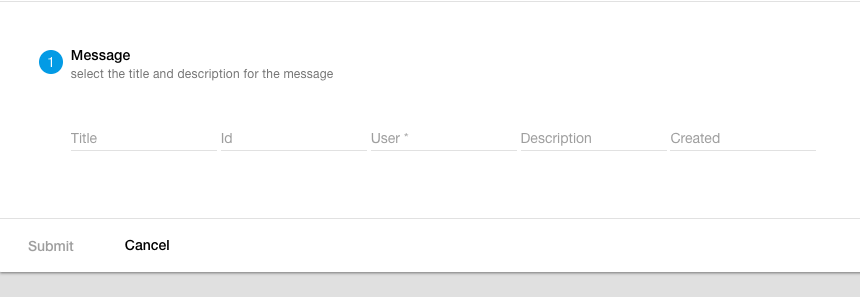
  <td-step label="Message" sublabel="select the title and description for the message">
    ..form goes here
  </td-step>
</td-steps>
This will render a single step with the provided label/sublabel with the form as content.

Example:
https://github.td.teradata.com/ux/covalent-training/commit/dcd375ee8ca040547403585cc76487c8ba8e1b7f
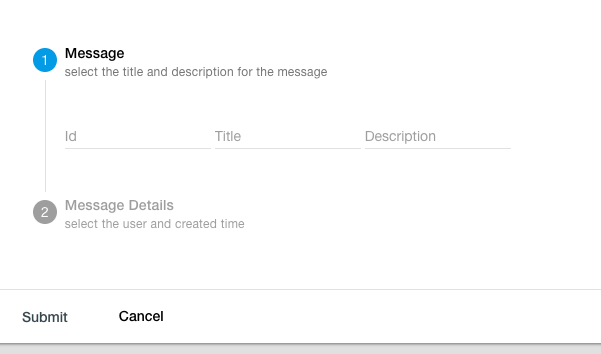
Now, we can do better than that, since with a small form there is no reason to use a stepper, but we are gonna force it to be a proper step flow by splitting the code into 2 forms.
<td-steps flex>
  <td-step label="Message" sublabel="select the title and description for the message">
    <form #messageForm="ngForm">
      <md-input-container>
        <input md-input placeholder="Id" [(ngModel)]="message.id" name="id">
      </md-input-container>
      <md-input-container>
        <input md-input placeholder="Title" [(ngModel)]="message.title" name="title">
      </md-input-container>
      <md-input-container>
        <input md-input placeholder="Description" [(ngModel)]="message.desc" name="desc">
      </md-input-container>
    </form>
  </td-step>
  <td-step label="Message Details" sublabel="select the user and created time">
    <form #messageDetailsForm="ngForm">
      <md-input-container>
        <input md-input
              placeholder="User"
              mdTooltip="User creating message"
              pattern="^(.*[a-z]){3}$"
              [(ngModel)]="message.user"
              #userValue="ngModel"
              name="user"
              required />
        <md-hint align="start">
            <span [hidden]="userValue.pristine || !userValue.errors?.pattern" class="tc-red-600">
              At least 3 (a-z)
            </span>
        </md-hint>
      </md-input-container>
      <md-input-container>
        <input md-input placeholder="Created" [(ngModel)]="message.created" name="created">
      </md-input-container>
    </form>
  </td-step>
</td-steps>
If you notice your screen, now we have 2 steps and each one has part of the form.
Example:
https://github.td.teradata.com/ux/covalent-training/commit/b41b4ea2d9953cccec75465435f714c9c2f76dcd
Required Steps
At this point you can toggle any step at any point, but a stepper is normally used to set a flow of required steps to achieve a goal. (In this case, a message). So we got to start adding validations to be able to block the flow if a step is not valid nor complete.
We will create a variable called metaState which will control the meta step state.
metaState: StepState = StepState.None;
and use it in our first step in its [state] input
<td-step #metaStep label="Message" sublabel="select the title and description for the message" [state]="metaState">
Notice how we are using a local reference to the step #metaStep, this will come into play when opening/closing the step.
We now leverage the td-step-actions template to set our step continue and cancel buttons with their click events.
<template td-step-actions>
  <button md-button [disabled]="!messageForm.valid" (click)="finishMetaStep(detailsStep)">Continue</button>
  <button md-button (click)="cancelMetaStep(); metaStep.close()">Cancel</button>
</template>
For the cancel button its simple, we just execute a cancel method that resets our inputs and close the step using the metaStep local reference.
cancelMetaStep(): void {
    this.message.id = undefined;
    this.message.title = undefined;
    this.message.desc = undefined;
    this.metaState = StepState.None;
}
For the continue buttons its a bit more complex since we need to open the next step once we are finished with it, so we need to create a local reference to our second step #detailsStep and pass it as an argument into our executed method.
finishMetaStep(nextStep: TdStepComponent): void {
  this.metaState = StepState.Complete;
  setTimeout(() => {
    nextStep.open();
  });
}
In the previous code, notice how we set the step state to complete and then we open the second step after a timeout after a timeout, this is because angular's change detection will be executed first and timeouts are put at the last spot of the queue (hence this method will be executed once all elements are rendered on screen).
Example:
https://github.td.teradata.com/ux/covalent-training/commit/78aa3aa2cfd1abb7016b08ecbfb8357303dc53bd
But i can still open the second step at any point, what gives?
All we have done until this moment is set the validation flow for the first step, but we never really did anything with the second one (besides opening it). We have to think about the requirements to enable (or disable) the second step, and in this case the most obvious requirement is that the first step needs to be complete.
From that requirement, we can leverage the[disabled] input in the second step to check if the state of the first step is complete.
[disabled]="!isMetaStepComplete()"
And the method will be pretty straightforward
isMetaStepComplete(): boolean {
  return this.metaState === StepState.Complete;
}
Try it. What happens now?
Example:
https://github.td.teradata.com/ux/covalent-training/commit/9a7dde3c6d427fd4761e68bef4d29778d1103b73
Bonus Lab:
Now try it with the second step, add a continue/cancel button the same way as step one and block the submit button until the second step is complete.
Example:
https://github.td.teradata.com/ux/covalent-training/commit/7a1d92bbc1641ff0eb0f187dba9dbe017461330b
https://github.td.teradata.com/ux/covalent-training/commit/7b47e11696e483a4354e7d707230d525da72aff4